Friday, June 17, 2011

Silicone Ring Molds on Etsy

Cindy has been perfecting her silicone mold making process and has been unable to produce new molds. However, we found a few extra silicone ring molds in the studio and listed them on Etsy for you! Get them while you can--they sell out FAST!

Cindy makes some of the only ring molds you can find. Made of high quality silicone, the molds produce a glossy, shiny casting. Silicone molds are known for their ability to produce a shiny casting, but they are also favored because they do not require mold release! Also, for some reason, we find that our castings seem to cure a little faster in a silicone mold rather than in a polypropylene mold.

There are a few silicone molds on eBay and the website, but you'll only find the rings molds on Etsy!
 

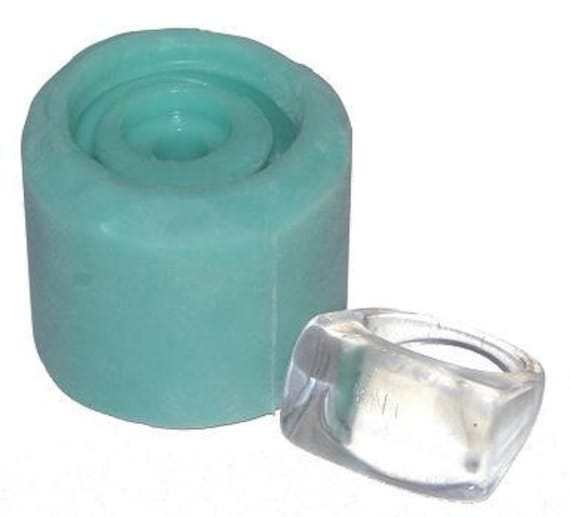
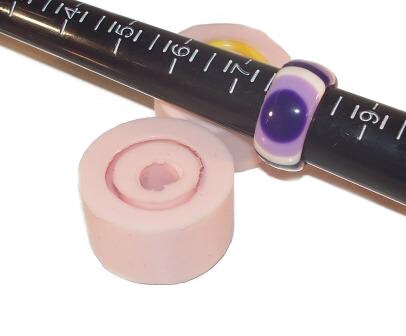
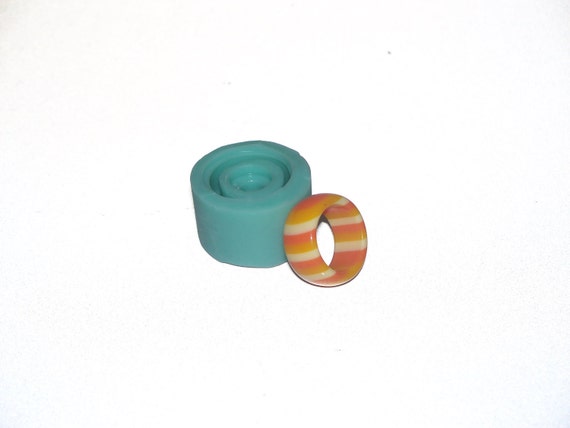
Click on the pictures above to view their Etsy listing. 

Tuesday, June 14, 2011

Crystal Clay Butterfly Hair Barette Tutorial in 3 Simple Steps!

We're still obsessed with Crystal Clay and created this fun little tutorial for you to get aquainted with the medium.


Supplies Needed:
-Resin Butterfly Casting (We used Mold 554)
-Black Crystal Clay Kit
-Swarovski Crystals or Rhinestones
-Hair Barette Blank


Always follow the safety guidelines on the Crystal Clay Kit Box.


1. After mixing your crystal clay together, following the instructions in the kit, begin covering your already casted butterfly. You can use a bit of water to smooth out the clay if needed.


2. Begin Crystallizing your butterfly. Get creative with it!

3. Put a small ball of crystal clay on the blank part of the bobby pin. Push it into the Butterfly and allow to cure. And Voila! You have a custom, hand made, butterfly hair barette that you created in 3 very simple steps! Wear it all summer and be the talk of the town.


Thursday, June 2, 2011


DIY Crystal Clay Ring

Supplies:

Crystal Clay Kit
Swarovski Crystals
Pewter Rectangle Bexel Ring Finding

 Safety Precaution: Always wear gloves when mixing Crystal Clay. Gloves are included in the kit.
 
1.       Pinch a small ball of Parts A and B of equal size and roll into a ball.

2.       Mix Part A and B until it is entirely consistent and looks like Part A without any Part B in it.

3.       Fit about ¾ of the clay into the large rectangular bezel on the ring.

4.       Begin adding your Swarovski crystals to the clay. Use the provided toothpick with beeswax end to pick up the crystals and place them as desired. You do not need to press them in hard, as long as they are on the clay, they will dry attached to the crystal clay. You can get really creative with your crystals. Think: initials, flowers, animal print, favorite shape, any pattern or design. You can also lightly trace out a pattern with a toothpick on the clay before you add your crystals. 


5.       Add half of the remaining clay into one of the side bezels.
6.       Begin adding crystals to this bezel.
7.       Add the remaining clay into the last remaining side bezel and repeat Step 6.
You’re finished! You have a gorgeous, one-of-a-kind homemade, DIY ring that looks much more expensive than the supplies cost! Wow all your friends with your talents or have a Crystal Clay Party!

Monday, May 30, 2011

5 Reasons Why ResinObsession LOVES ArtFire

Did you know we sell on ArtFire too? Well, we do, and here's 5 Reasons why:

1. It's a community of crafters and artists. Our products reach our target market without any marketing. We get to put the product where the consumer is.

2. We're inspired by the works our customers and other craftsters. As soon as we login to ArtFire, we're hit in the face with gorgeous hand made creations.

3. Listing new items is made super easy. If you're looking for a simple platform, where you won't wonder where a handbook is, to sell your items, then you're looking for ArtFire.

4. It's easy to host sales and markdowns. Once again, no handbook or lengthy research needed here. ArtFire makes it easy on you.

5. Pretty invoices. We sell pretty products. And we like pretty invoices to ship with them. :)

Are you on ArtFire? Sign up here: http://www.artfire.com/users/ResinObsession/sell-crafts

Wednesday, May 25, 2011

Drililng Holes is no Fun!

Drililng holes is a pain in the youknowhat when it comes to resin jewelry! (We even had to create a youtube video for it)!


But, we have figured out a way to avoid it...TOOBIES!

Toobies are our way of creating a hole in a casting without touching a single power tool. :)

Read our How-TO:

"
<><> <><>
How to Use Toobies


People ask us about toobies all the time! While we never mind answering, we thought we would create an article that spells it all out.

Toobies are unique way to create a hole in a casting with out drilling a hole. For example, if you have a rectangular casting that is 1 inch wide, and 2 inches tall, and you want the hole to be in the middle of the rectange, you would cut a 1 inch piece off of your toobie to make a tiny tooby. You embed this in your casting. This means you must create your casting in 2 parts.

1. Fill the mold a little less than half way with resin and let that cast.

2. Place the toobie into the mold so it is sitting on the hard resin. Make sure the toobie fits snug! You don't want any resin to be able to seep into the hole. After you're certain you have a good fit, secure the toobie in place with a drop of resin or a drop of superglue (We like how fast super glue dries).

3. After the toobie is secure, finish up your casting like normal and voila! You have a hole in your casting that didn't require a drill.
Easy as pie, right?"

Published on May 18, 2010 at ResinObsession.com

Purchase Toobies at ResinObsession.com

Wednesday, May 18, 2011

ResinObsession Featured in BEADSTYLE Magazine & beads 2011 Buyer's Guide

Wahoo! We are super excited to be featured in two magazines this month!

We just love the comment in beadstyle's magazine "ResinObsession's steampunk clip art images are just begging to be encased in resin." aah soo sweet!

c/o BEADSTYLE Magazine pg. 62


Our ad in the beads 2011 Buyer's Guide is just as exciting! It features all of our brand name products. We have never been more proud! :)

c/o beads 2011 buyer's guide pg. 9

:)

Tuesday, May 3, 2011

Mother's Day Coaster Tutorial

Make Mom feel special with a home made coaster embellished with your favorite picture of you both! This tutorial is inexpenside and great for beginners. Send us pictures of your finished product and we'll add it to this page and our gallery.

You will need:
Coaster Mold 893
Flower Petals
Mold Release
Picture of you and mom
Resin Colorant (optional)
Reusable Mixing Cups
ResinObsession Stir Stix
ResinObsession SuperClear Resin


1. After Mixing your resin and spraying your mold with mold release, pour a thin layer of resin in the outer circle of the mold. You just need enough to cover the bottom of the mold.


2. Sprinkle in a thin layer of petals. It doesn’t need to be perfect, we will be adding another thicker layer of petals.


3. Pour another thin layer of resin until the petals are about half covered. Allow this layer to cure until “gummy” (approx. 2 hours).


4. Sprinkle another layer of petals until you have reached your desired effect.


5. Pour a layer of resin until the basin is about two thirds full. Using the end of your stir stick, push the petals down, touching the stir stick to the bottom of the mold basin, until you are pleased with the arrangement of the petals. Allow to cure until hard.


6. Pour a thin layer of resin into the center of the mold that just barely covers the bottom. Allow to cast until hardened.


7. Cut out the picture you want as the center of the coaster (We have created a downloadable template for you to cut around).


8. After all resin in mold is fully casted and hard, place your picture in the center of the circle. TO prevent air bubbles from forming under the image, try to slide your image into the mold rather than plopping it straight down.


9. OPTIONAL: You can add color to your last pour of resin to compliment your flower petals. Follow your specific colorants mixing instructions to achieve your desired result. Pour the last of your resin into the mold, about 1 mm away from the top.


10. When fully cured, take coaster out of mold and VOILÁ! You have an inexpensive gift from the heart to give to the leading lady in your life on Mother’s Day.